Building a Tech Course Curriculums Platform with MindsDB Models and Django
A complete comprehensive guide to integrating NLP in any Python projects


We often find ourselves overwhelmed by the abundance of free and paid online tech courses and resources. That's why today we will build a platform that curates the best tech course curriculums and organizes them based on skill level, topic, and user feedback. To improve the user experience and accelerate app growth, We will integrate MindsDB models for sentiment and text classification into the platform. In this tutorial, We will walk through MindsDB models and Django are used for the backend, and Next.js for the frontend to build this platform.
What is MindsDB?
MindsDB is an open-source, automated machine-learning platform that enables developers to build and integrate machine-learning models into their applications quickly and easily. MindsDB provides a simple interface that allows you to train, test, and deploy machine learning models without having to write any code. It also supports a wide range of use cases, such as classification, regression, and time series forecasting.
What's the Problem?
New programmers end up in something called the Tutorial Hell. Whereby they keep watching and reading various online tutorials from various content creators. Tutorials are good but most don't cover all the aspects a new programmer needs to suceed in a skill.
What's the Solution?
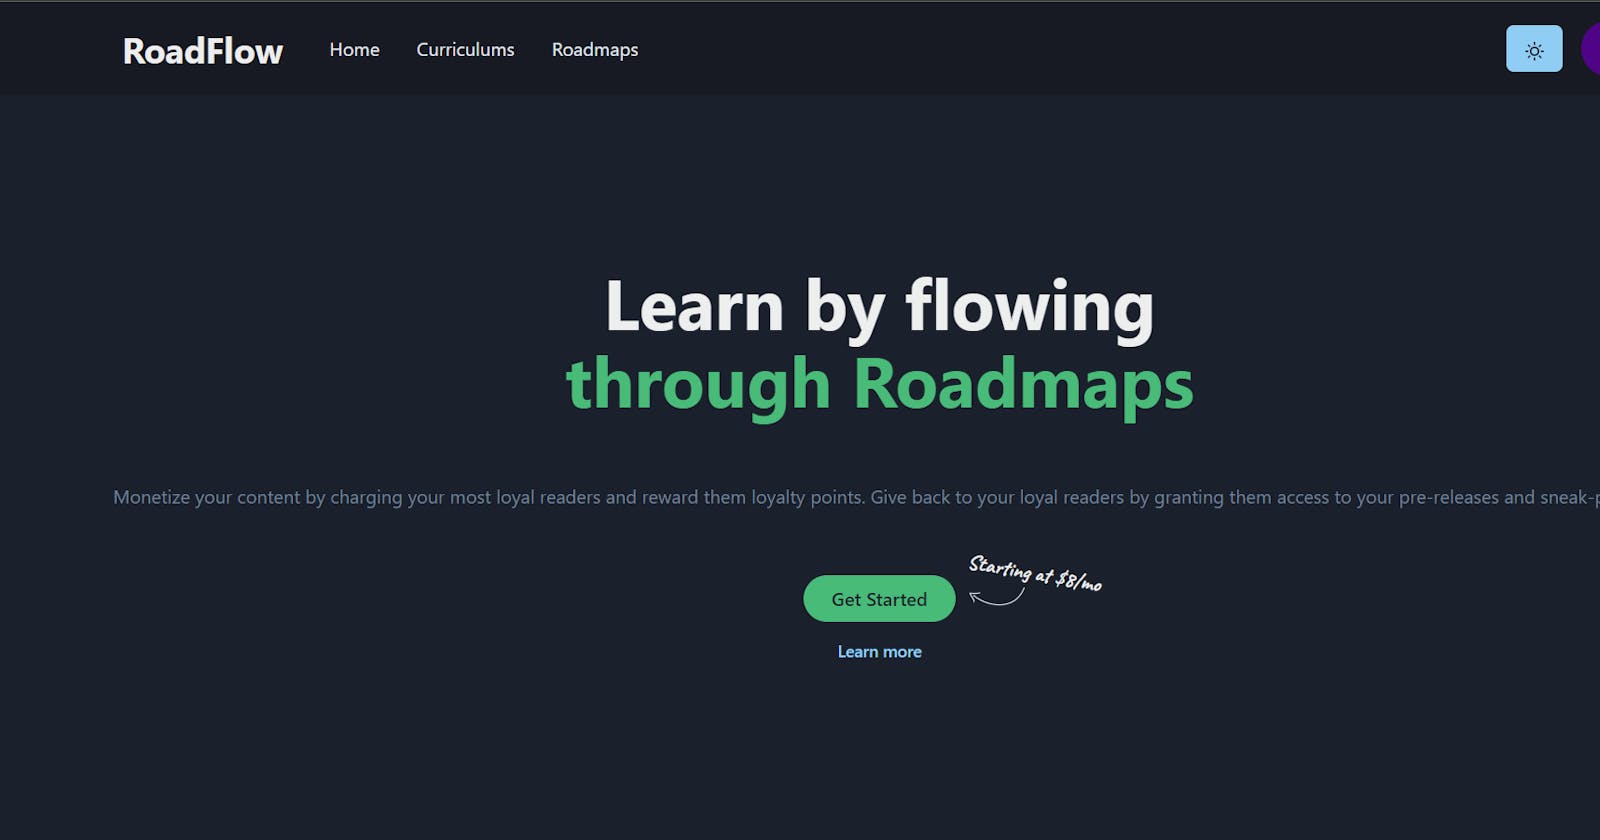
This project is built with the goal of helping new programmers find quality tech curriculums and resources. The platform curates the best resources and organizes them into curriculums based on user feedback. To improve the user experience and accelerate app growth, the platform integrates MindsDB models for sentiment and text classification on user reviews.
Why do we need to classify Reviews?
When users are progressing through a curriculum or have completed it. Their reviews are important so that we can use them to reorganize the curriculums based on user needs and their learning experience.
Using AI to classify user reviews sentimental can help us categorize or filter reviews by priority and what we need to work on ASAP. Doing this manually would be time-consuming and slow down problem analysis and updates.
Why MindsDB Models?
In this project, we used MindsDB models for sentiment and text classification to classify user curriculum reviews. The user reviews are classified by labels and sentiment. MindsDB models are used because it's easier to integrate than to install Pytorch and LLM (Large Language models).
We can train our models right in the MindsDB SQL editor. Yes, we will use SQL queries to train our AI models. MindsDB NLP engine is currently powered by Hugging Face and Open AI. It supports NLP tasks like Text Classification and Zero-Shot Classification.
By using MindsDB Python SDK, we can easily connect to our MindsDB Cloud Server and execute AI queries on our pre-trained models with just a few lines of Python code. MindsDB's large community and learning resources can help us to find solutions on how to use them to solve any problems we might encounter.
Building The Project
We will cover the project build-up from the DB design to the product mvp. The repository for the completed project Backend API and Frontend Web contain installation guides to set up the project and start using it.
Project Prerequisites
To follow through with this article, we need:
A MindsDB cloud account. Create a free cloud account at cloud.mindsdb.com.
Redis for caching
Basic knowledge of Django, Django Rest Framework, React, and NextJs frameworks
Django Memcache can be configured instead of redis if problem occurs when installing redis.
Let's start building 🤓💻
Productivity Foundations
Database Design
First of we need to have an understanding of how the Database will be structured. By using dbdiagram.io, we can design relation database structures. Here is a database diagram that we can use.

This can help us get clarity on how the project will be structured. That's like 50% of the problem-solving done here. We would find out tables related to each other and how to categorize the apps in Django. This saved will save a lot of time instead of jumping on the project without direction.
Need the DB Schema used to generate the DB diagram - visit here.
Flow Design
Here is the link to the Figma jam.
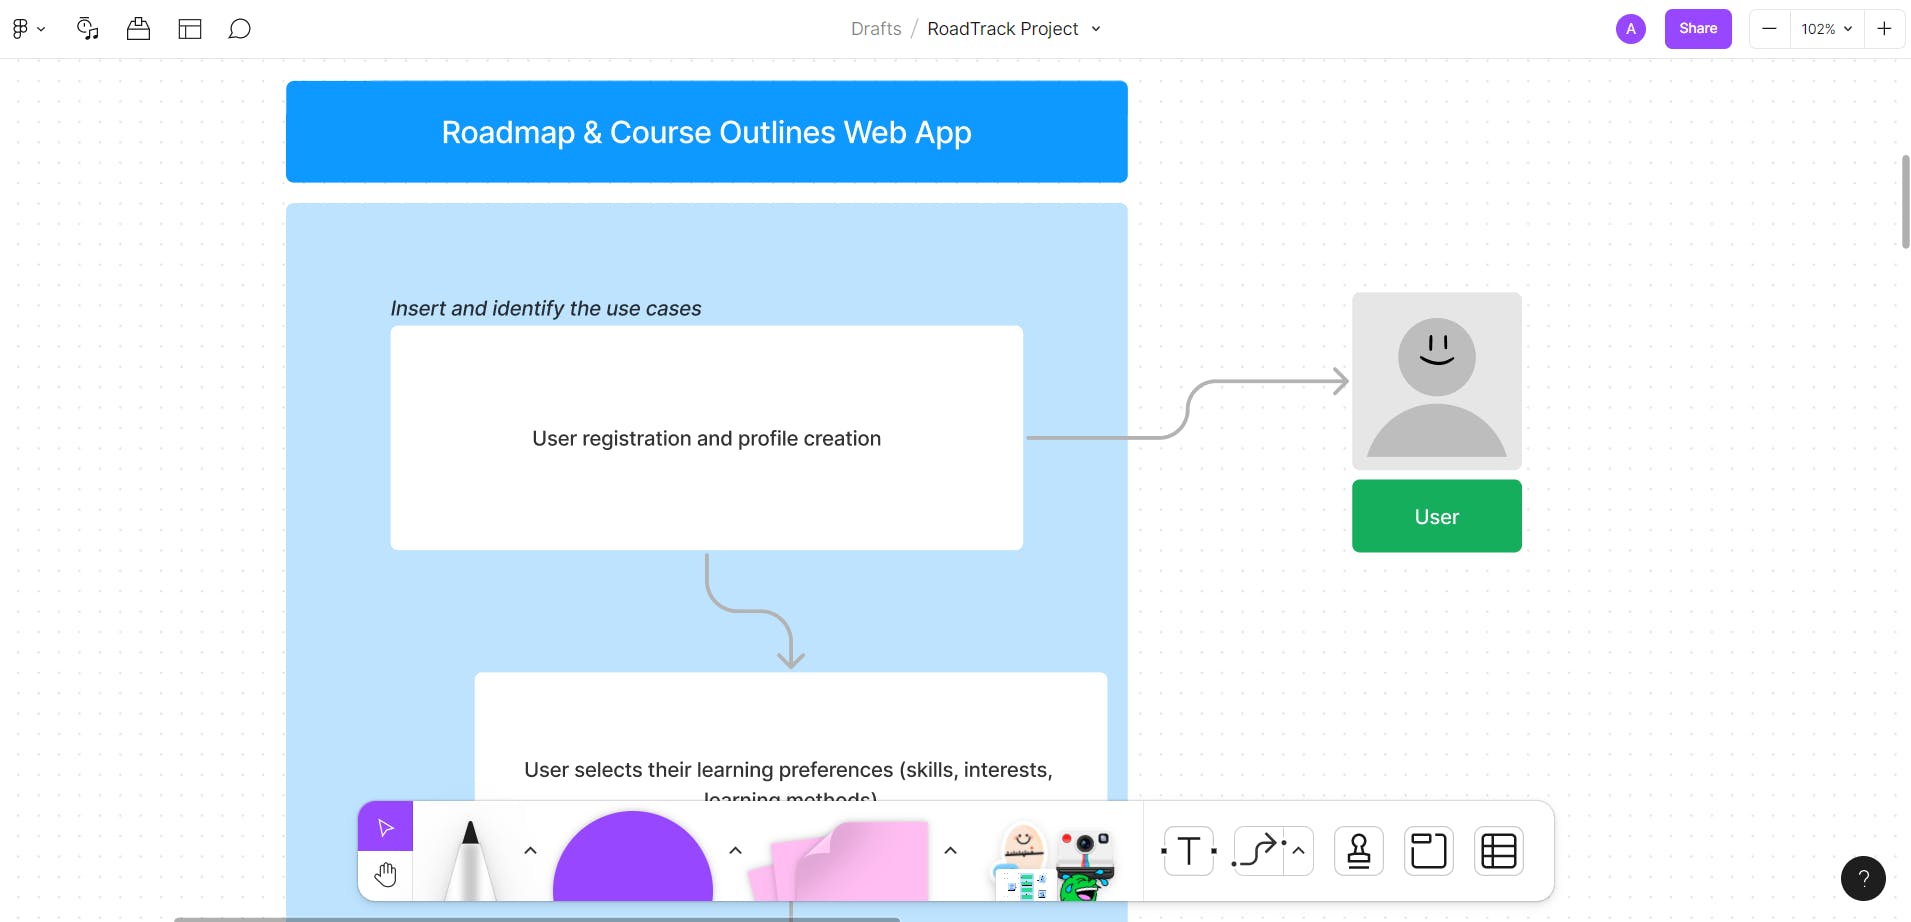
Having a simple design for the application flow will go a long way to help us have a working application in our minds. Also finding solutions to other basic problems like the best authentication method to use, how to organize the API, and how the user will use the application.
Rest API Development
Django and Django Rest Framework are used for API development and documentation. Swagger allows us to test the API endpoints from the documentation itself. The backend repository has an installation and usage guide in README.md for setting up the project and testing it with ease.
The API is classified into three major sections:
Account - Authentication and Authorization
Curriculum - Organizing curriculums, enrollments, quizzes, and reviews.
MindsDB Classify - Classifying texts by sentiments and labels.
Account
When a user registers, they will get an OTP in their email to verify their email. The user's OTP is cached for future validations. After validation, the OTP is deleted from the cache. This Django app has the following features:
Register
Login
Forget password
Change password
Updating user profile
We used JWT (JSON Web Tokens) for user authentication. This allows us to have a stateless authentication that the frontend can easily manage. Simple JWT allows us to use JWT in Django Rest Framework.
Curriculums
This is the main application in the Django project. This application supports the following features:
user enrollments, progress tracking,
quiz creation, quiz submission,
curriculum, syllabus, resources creation,
reviews submission and classification.
The backend repository contains comments that explain how the Models, Views, and Serializers work.
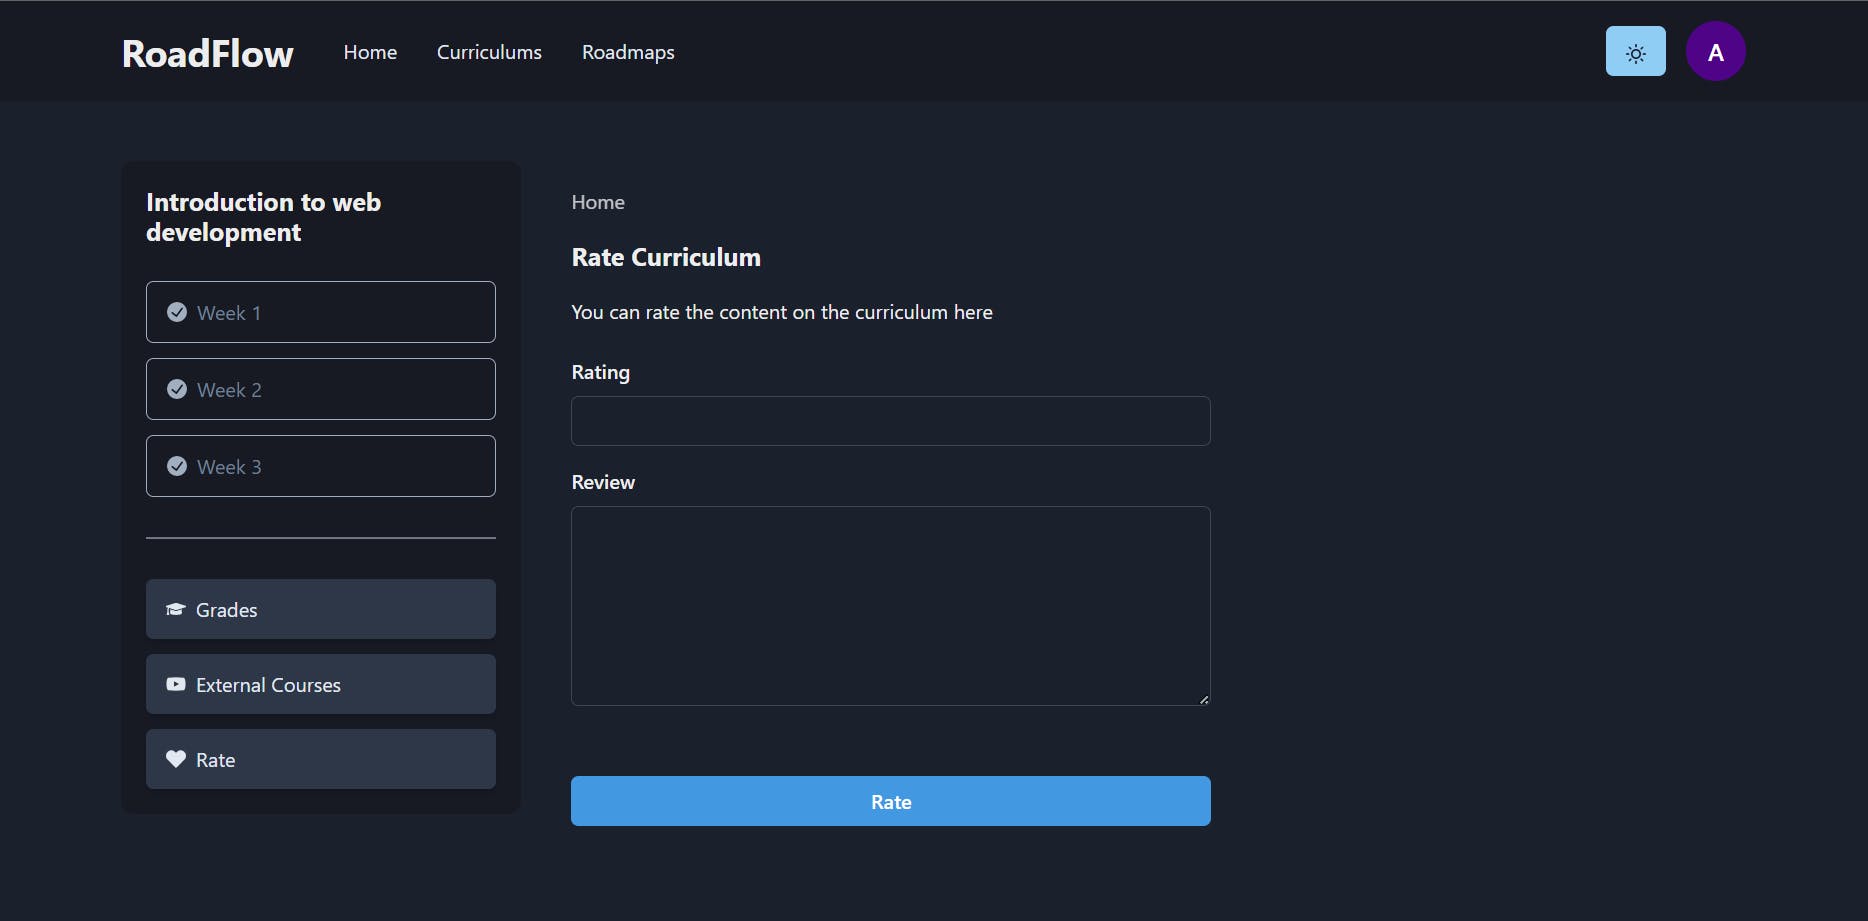
Basically, the user can search for curriculums and enroll in them. An enrolled user can progress through the curriculum syllabus by completing quizzes for each lesson. At the end or anytime while taking the curriculum they can submit reviews any kind of reviews. When a new review is submitted it is classified and updated in the database.
NLP Classification using MindsDB
Our reviews are classified and stored in the CurriculumReview table.
class CurriculumReview(models.Model):
    """Curriculum Review Model"""

    SENTIMENT = (
        ('POS', 'Positive'),
        ('NEG', 'Negative'),
        ('NEU', 'Neutral'),
    )

    LABEL = (
        ('A', 'Course Content'),
        ('B', 'Exercises'),
        ('C', 'Course Structure'),
        ('D', 'Learning Experience'),
        ('E', 'Support'),
    )

    enrollment = models.ForeignKey(
        CurriculumEnrollment, on_delete=models.CASCADE)
    rating = models.PositiveSmallIntegerField(
        default=0,
        validators=[MinValueValidator(1), MaxValueValidator(5)]
    )
    review = models.TextField(null=False, blank=False)
    created_at = models.DateTimeField(auto_now_add=True)
    updated_at = models.DateTimeField(auto_now=True)
    sentiment = models.CharField(
        max_length=3, null=True, blank=True,
        choices=SENTIMENT
    )
    label = models.CharField(
        max_length=1, choices=LABEL, null=True, blank=True)
For the sentiment labels, we have:
SENTIMENT = (
    ('POS', 'Positive'),
    ('NEG', 'Negative'),
    ('NEU', 'Neutral'),
)
For the Zero-Shot classification labels, we have:
LABEL = (
    ('A', 'Course Content'),
    ('B', 'Exercises'),
    ('C', 'Course Structure'),
    ('D', 'Learning Experience'),
    ('E', 'Support'),
)
These can then be used as Django Charfield choices, which we can configure in the Django admin for filtering. Allowing us to filter reviews by their labels.
Also, we will see how can reuse this when querying our MindsDB server.
Creating and Training the MindsDB AI Models
First of all, the MindsDB documentation is packed with resources to understand how we can use it.
Today we will be using the following NLP models from Hugging Face:
Sentiment Classification -
cardiffnlp/twitter-roberta-base-sentimentZero-Shot Classification -
facebook/bart-large-mnli
As we have read earlier, MindsDB works seamlessly with Hugging Face NLP models. By running SQL queries in our MindsDB Cloud SQL editor we can easily create and train these models to be used in our project.
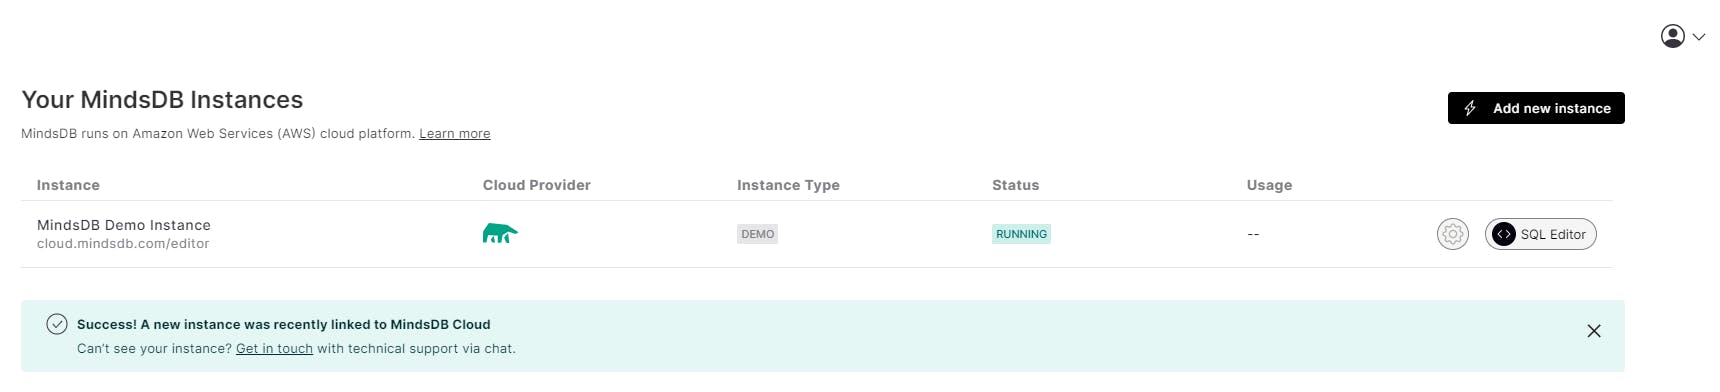
To access our Cloud editor we need to sign in - https://cloud.mindsdb.com/login. Don't have an account yet? Create one here https://cloud.mindsdb.com.
After signing in, we can see our free demo instance is already set up and running. Click it to access the SQL Editor.
On the right panel in the SQL Editor, we can find the Learning Hub with tutorials and resources for using MindsDB SQL Editor.
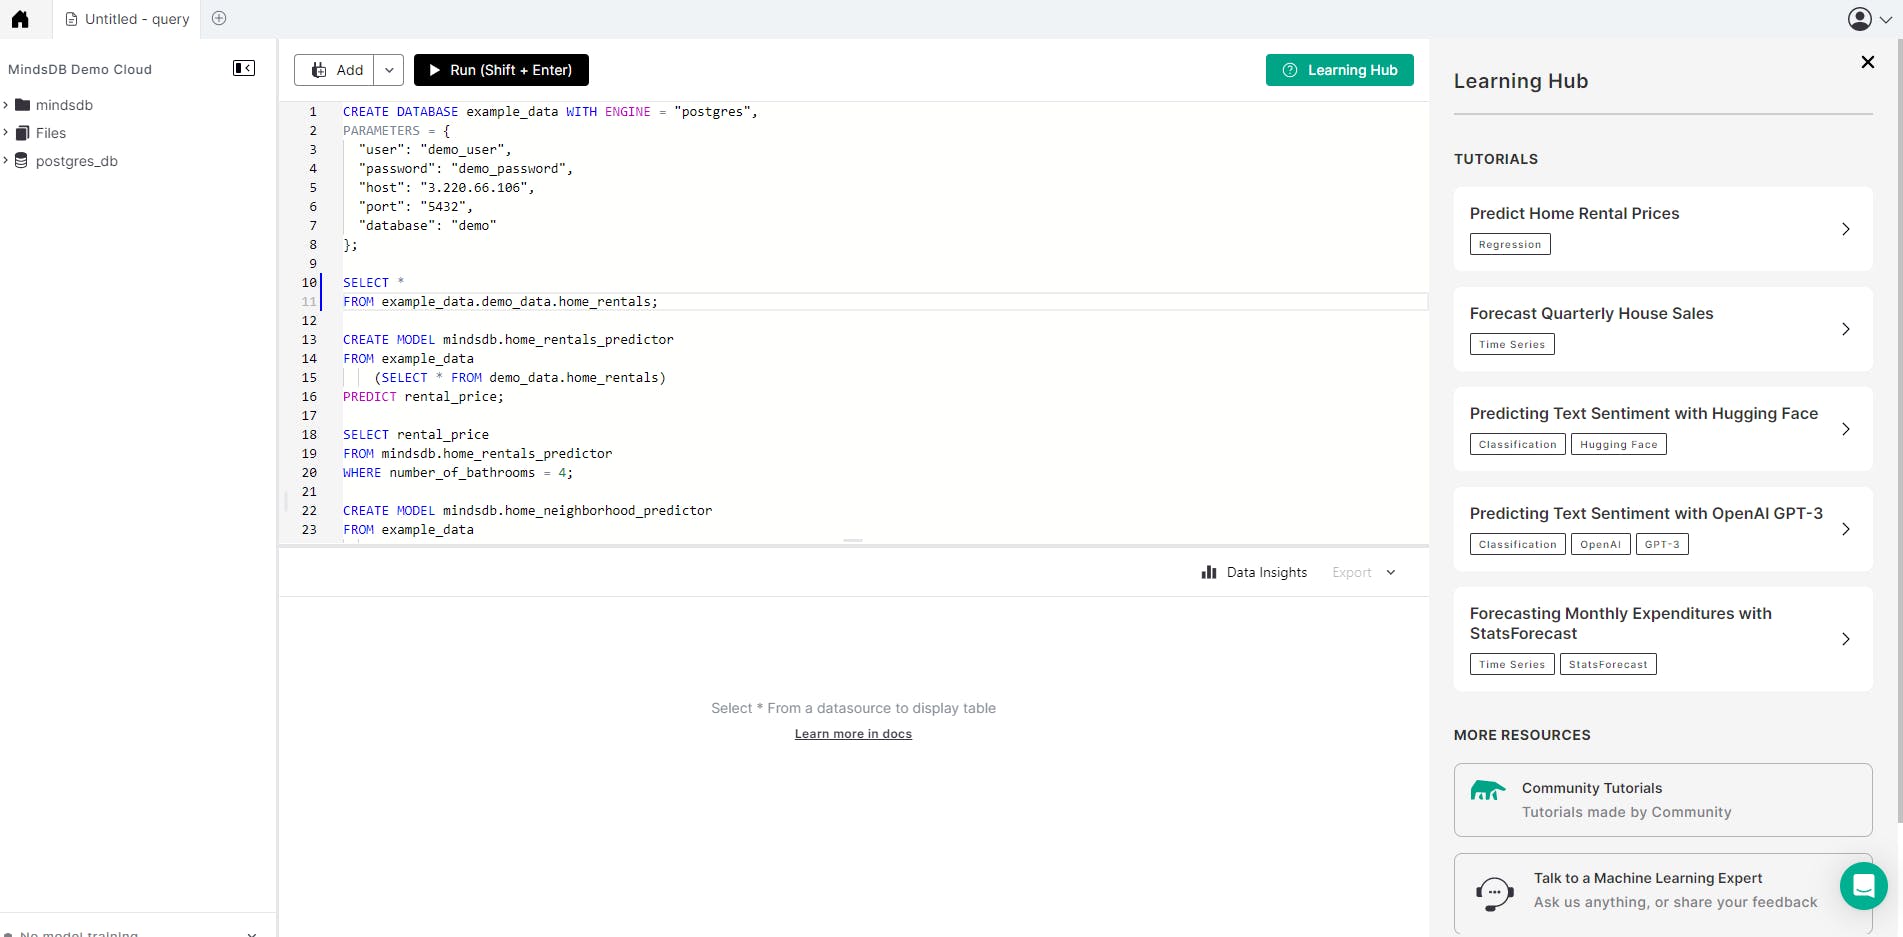
We can create files, databases, and projects in the SQL Editor. By default, we have a project, mindsdb, already created for us. A project is a collection of data that includes all the necessary information for building, training, and testing a machine-learning model.
A. Training the Sentiment model
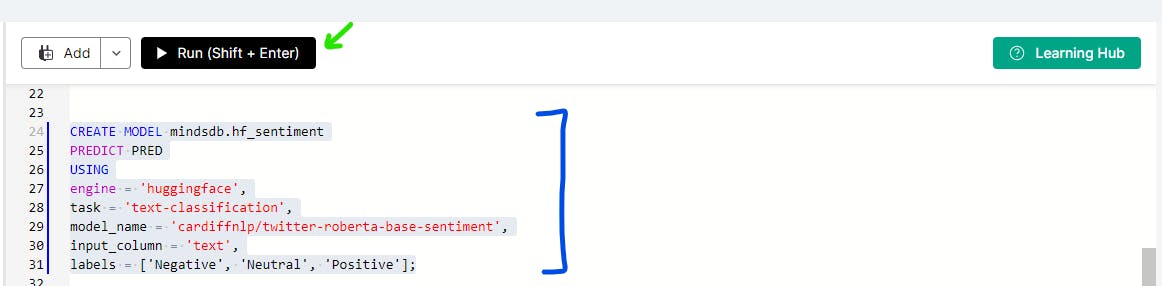
Copy and paste the SQL statement below into the editor.
CREATE MODEL mindsdb.hf_sentiment
PREDICT PRED
USING
engine = 'huggingface',
task = 'text-classification',
model_name = 'cardiffnlp/twitter-roberta-base-sentiment',
input_column = 'text',
labels = ['Negative', 'Neutral', 'Positive'];
The labels are from the labels we want to use for sentiment in our Django project.
In mindsdb.hf_sentiment - mindsdb is the project name while hf_sentiment is the model name. We can use any name for the model name, but we need to take note of it because it will be required in the Django project to access the model.
To run the SQL statement, we need to highlight it in the SQL editor and click on Run towards the top of the screen or Shift + Enter.
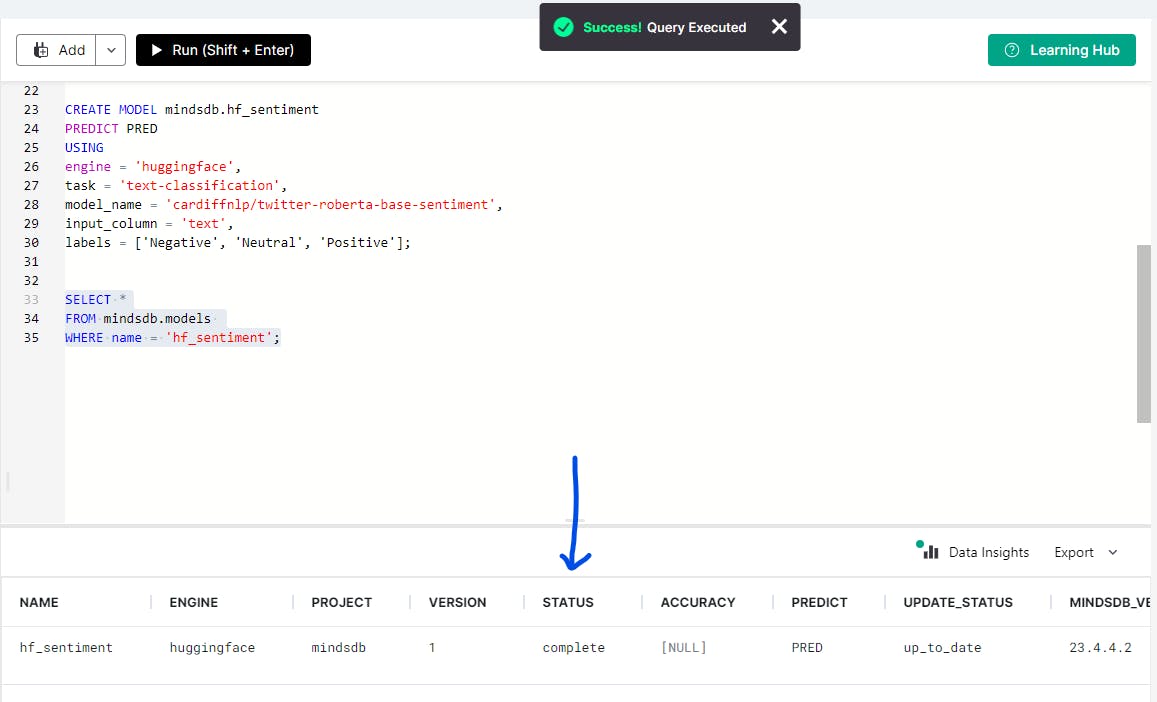
Running the statement creates a new model. To check the status of the hf_sentiment model, run the following statement.
SELECT *
FROM mindsdb.models
WHERE name = 'hf_sentiment';
Status = complete tells us that the model training is complete.
To test the model, we run the statement below
SELECT *
FROM mindsdb.hf_sentiment
WHERE text = 'I like you. I love you.';
This results in a response that contains the prediction PRED_explain.
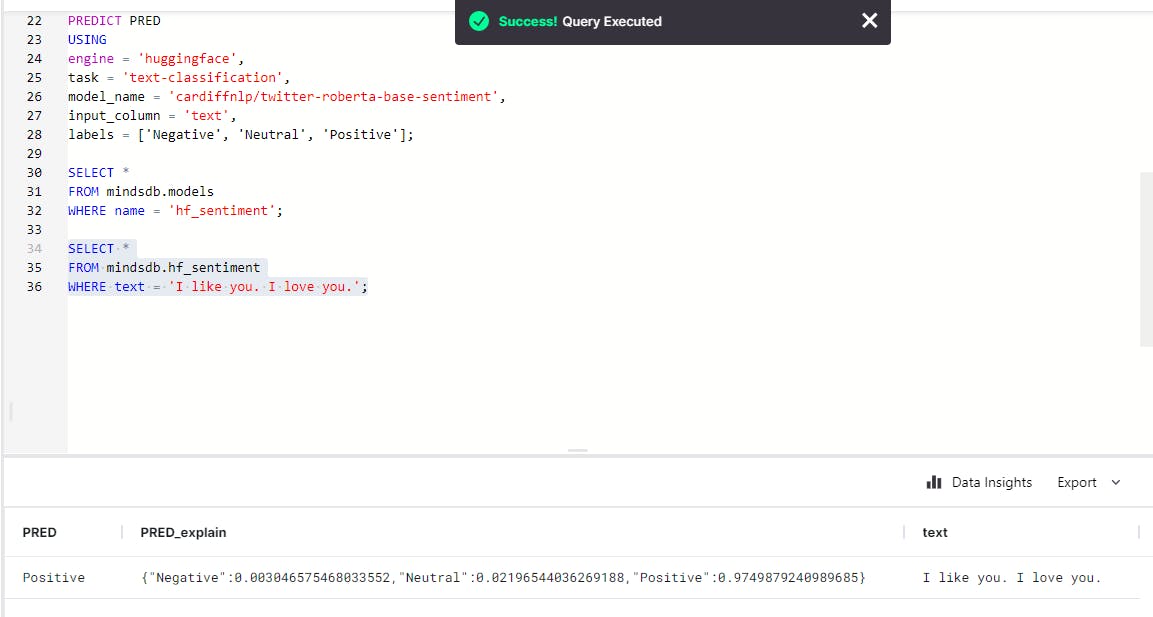
The prediction tells us that the text sounds more Positive than Neutral or Negative. In our Django project, we will need to write a program that retrieves the label with the maximum result.
B. Training the Zero-Shot classification model
Using what we have learned when creating the sentiment model. Let's create one for Zero-Shot too using a similar process.
Create -> Check Status -> Test
To create the model, run the following statement.
CREATE MODEL mindsdb.hf_classify
PREDICT PRED
USING
engine = 'huggingface',
task = 'zero-shot-classification',
model_name = 'facebook/bart-large-mnli',
input_column = 'text',
candidate_labels = ['Course Content', 'Exercises', 'Course Structure', 'Learning Experience', 'Support'];
We also used our Django project labels as the
hf_classifylabels here too. Also don't forget to note the model namehf_classify.
To check for the status of the newly created model, run the following statement.
SELECT *
FROM mindsdb.models
WHERE name = 'hf_classify';
Wait until it's completed training.
To test the model, run the following statement.
SELECT *
FROM mindsdb.hf_classify
WHERE text = 'This is a nice curriculum. Explains a lot about HTML tags and css design. But needs more video contents. Thanks.';
We should get the following response.
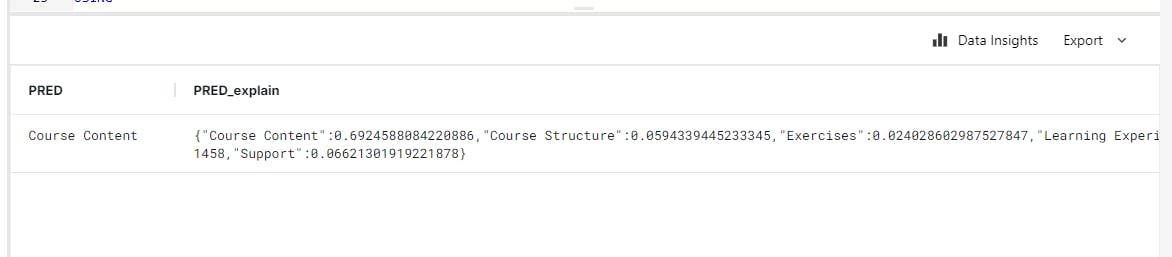
Telling us that this is a review that tells us how the user feels about the Course Content.
Integrating MindsDB with Python
After following the installation guide in the backend repository README.md, we should have installed the required dependency for integrating MindsDB because it's included in the requirements.txt file in the repository.
This is the MindsDB Python SDK. To install it explicitly using pip, run the following command in the terminal.
pip install mindsdb-sdk
This is the program from the src/utils/base/mindsdb.py file in the repository.
import mindsdb_sdk
from django.conf import settings
from Curriculum.models import CurriculumReview

username = settings.MINDSDB_SERVER_USERNAME
password = settings.MINDSDB_SERVER_PASSWORD

server = None


def connect_server():
    global server
    if not server:
        server = mindsdb_sdk.connect(
            'https://cloud.mindsdb.com',
            login=username,
            password=password
        )
    return server


def make_query(text: str, model: str):
    return f"""
    SELECT *
    FROM mindsdb.{model}
    WHERE text = '{text}'
    """


def classify_text(text: str):
    server = connect_server()
    project = server.get_project('mindsdb')
    max_label = ""
    max_score = 0

    df = project.query(make_query(text, "hf_classify")).fetch()
    data = df['PRED_explain'][0]
    for k, v in CurriculumReview.LABEL:
        current = data.get(v)
        if current > max_score:
            max_score = current
            max_label = k

    return max_label


def sentiment_text(text: str):
    server = connect_server()
    project = server.get_project('mindsdb')
    max_label = ""
    max_score = 0

    df = project.query(make_query(text, "hf_sentiment")).fetch()
    data = df['PRED_explain'][0]
    for k, v in CurriculumReview.SENTIMENT:
        current = data.get(v)
        if current > max_score:
            max_score = current
            max_label = k
    return max_label
Let's go through this program 🤓
Importing the required modules
 import mindsdb_sdk
 from django.conf import settings
 from Curriculum.models import CurriculumReview
We imported the
CurriculumReviewmodel so we can have access the labels defined in it.The Django setting is imported so we can have access to the
MINDSDB_SERVER_USERNAMEandMINDSDB_SERVER_PASSWORDdefined when we set up the backend project.Creating a connection to our MindsDB cloud server.
 server = None

 def connect_server():
     global server
     if not server:
         server = mindsdb_sdk.connect(
             'https://cloud.mindsdb.com',
             login=username,
             password=password
         )
     return server
We did it this way so that if the same Django process already has a connection created for the mindsdb_sdk server, we will use it instead of creating it again.
Creating SQL model queries to our
mindsdbproject in the clouddef make_query(text: str, model: str): return f""" SELECT * FROM mindsdb.{model} WHERE text = '{text}' """This function takes the text to classify and the model name,
hf_classifyorhf_sentiment, and returns a query that we can execute.Classifying text to label
 def classify_text(text: str):
     server = connect_server()
     project = server.get_project('mindsdb')
     max_label = ""
     max_score = 0

     df = project.query(make_query(text, "hf_classify")).fetch()
     data = df['PRED_explain'][0]
     for k, v in CurriculumReview.LABEL:
         current = data.get(v)
         if current > max_score:
             max_score = current
             max_label = k

     return max_label
We first
get the connection to our MindsDB cloud
then get the project,
mindsdb,then use the project to make a query to the
hf_classifymodel,parse the response and get the label with the maximum result.
Classifying text to sentiment
Works exactly like
classify_text, we just usedCurriculumReview.SENTIMENTwhen getting the label with the maximum result.
This is a program from /src/Curriculum/api/base/views.py for RateCurriculum view.
def perform_create(self, serializer):
    cur = self.get_object()
    enrollment = self.request.user\
        .get_curriculum_enrollment(cur)
    review = serializer.save(enrollment=enrollment)

    # Classify review here, in live app use cron job
    review.sentiment = sentiment_text(review.review)
    review.label = classify_text(review.review)
    review.save()
Ensuring the review label is updated when a user submits a new review, we classify it and update the database.
A performance problem here is that the user has to wait for our classification algorithm to work before it returns a response. In a production environment, it will be better to do the labeling later by using a Queue or Cron job that classifies reviews in the background.
Impact
By using MindsDB models, we are able to quickly and accurately classify user curriculum reviews, allowing us to identify and address areas for improvement. Using the MindsDb cloud made it easier to integrate AI into the application. Doing this the manual way will be hard and time-consuming.
This helps us to continually improve the platform and curate the best possible curriculums for users. Additionally, by using Django and Next.js, we are able to build a scalable and secure platform that can handle a large number of users and provide a seamless user experience.
Conclusion
In this tutorial, we showed how to use MindsDB models and Django for the backend to build a tech course curriculums platform. By implementing MindsDB models for sentiment and text classification, we can quickly and accurately classify user curriculum reviews and improve the user experience of your platform. With the power of MindsDB, we can build a scalable and secure platform that provides a seamless user experience.
Explore the features of MindsDB by checking out their official documentation and joining the Slack community.
Start building today by creating a free MindsDB Cloud account!
Want to Contribute?
This project is Open Source and can help a lot of new developers organize online free content into structured curriculums saving them from the Tutorial Hell.
Connect with me on Twitter | LinkedIn | GitHub, and let's work together, Thanks. 🤓💻