


Blockchain is an amazing technology to dive into. It has been around for some time now and powering very popular technologies like Ethereum.
To make this article as simple as possible, the definitions and terminologies would be summarized to just key points needed for the project you will build in this article. But links to amazing educational articles will be provided for each.
By the end of this article, you would understand Public Key Cryptography, Elliptic curve digital signatures and how they can be used to make the world a better place. I will take you one step at a time on how to build a blockchain node.

What is Cryptography
Cryptography is a way of securing a piece of information. It's the study of cryptographic hash functions.
Cryptographic hash functions are mathematical functions that take an input of any size and convert it to a fixed-sized output. It's a one-way ticket, you can't get the input from the output.
Cryptography is at the heart of blockchain and Web3. Here is an online tool containing lots of hash functions you can play with.
Public Key Cryptography
It's the use of two keys, a public key (a key that is known to everyone), and a private key (a key that is kept secured). The private key can encrypt a message that can only be decrypted by the public key, verifying that the message was indeed sent by someone with the right private key and vice versa.
Public key cryptography is also called asymmetric cryptography because it uses a pair of related keys.
RSA and ECDSA are two popular algorithms used for public cryptography. RSA is based on the idea that you can quickly find the product of two prime numbers, but extremely hard to factor out the prime numbers once you have the products. Read more about RSA.
ECDSA (Elliptic curve digital signature algorithm) uses elliptic curves. Read more about it on Wikipedia.
Why use ECDSA
ECDSA provides the same level of security as RSA but with small key sizes. RSA keys can be very large making it take a long to transfer over a network.
ECDSA is the algorithm used by Bitcoin, which is the secp256k1 curve.
Building an ECDSA node
This is an example of a blockchain node that uses the ECDSA signing algorithm. The project is a simple react frontend application that allows users to send money to each other. There will be a single server node, which makes this centralized but there will be an article later on how to deploy a program on Ethereum.
Goal
The server would manage the balances of the users. The goal is to enable the server to verify who is sending the money to make sure that a person can only send money from their wallet.
Project prerequisites
You will need to have a basic knowledge of React as it is used for the front end. With a basic understanding of Express.
Application Architecture
There is the front end, which has the UI part of the project that allows users to enter their wallet addresses and attempt to send money to others. The Idea here is that, when a user tries to send money, we would generate a transaction for them to sign with their private key, then input the signed transaction which would be sent to the server with their public key (wallet address), address where money should be sent, and the amount of money to be sent.
The server would take this signed transaction and the public key, then verify if the transaction was indeed signed using the right private key of the public key. If it's correct, it updates the users (sender and recipient) balances, else it returns an error message.
Client-Side React App
We would use Vite for our front-end tooling.
Create a new directory called wallet-node and move into the directory.
Run npm create vite@latest, enter client as your project name, react as the framework and JavaScript as the variant.
Move into the client directory just created by Vite. Run npm i to install the packages from the template.
Install Sass as a dev dependency using this command npm i -D sass. This will install the sass package as we will be using sass for our CSS styling.
The last installments are:
Axios -
npm i axiosEthereum Cryptography -
npm i ethereum-cryptography
Now, edit the value of the title tag in the index.html file to ECDSA Wallet or anything you want.
Move into the src directory, delete the assets directory, index.css and App.css files.
Edit the main.jsx file, remove the line for import './index.css'.
Edit App.jsx by removing everything in it and pasting in the following code;
import Wallet from "./Wallet";
import Transfer from "./Transfer";
import "./App.scss";
import { useState } from "react";

function App() {
  const [balance, setBalance] = useState(0);
  const [address, setAddress] = useState("");

  return (
    <div className="app">
      <Wallet
        balance={balance}
        setBalance={setBalance}
        address={address}
        setAddress={setAddress}
      />
      <Transfer setBalance={setBalance} address={address} />
    </div>
  );
}

export default App;
We will create a Wallet and Transfer component, and our App.scss file for the sass styles.
From the above code, two stateful values were created, balance and address. The balance will be used to keep track of and manage an address balance, while the address will be used to share a user address among the Wallet and Transfer components.
The transfer component accepts a prop setBalance which would be used to set the state of the user's balance after the money has been transferred successfully.
Create an App.scss file in the src directory, then paste the following code;
body {
  font-family: "Muli", sans-serif;
  font-weight: 300;
  background-color: #e2e8f0;
  padding: 40px;
}

label {
  display: flex;
  flex-direction: column;
  letter-spacing: 0.05rem;
  font-size: .8em;
  font-weight: 400;
  color: #222;
}

.app {
  display: flex;
  max-width: 1400px;
  flex-wrap: wrap;
  gap: 12px;
  margin: 0 auto;
}

.container {
  flex-grow: 1;
  margin: 0 20px;
  background-color: #fff;
  border: 1px solid #cbd5e0;
  box-shadow: 0 1px 2px 0 rgba(0, 0, 0, 0.05);
  border-radius: 0.375rem;
  padding: 40px;

  label {
    margin: 10px 0;
  }

  .button {
    margin-top: 10px;
  }
}

input {
  padding: 10px 0;
  border-radius: 0.125rem;
  border: 1px solid rgb(226, 232, 240);
  background-color: #fdfdfe;
  padding-inline-start: 0.75rem;
  font-size: 0.875rem;
}

.button {
  background-color: #319795;
  border-radius: 0.125rem;
  padding: 10px 20px;
  color: white;
  display: inline-flex;
  text-transform: uppercase;
  letter-spacing: 1px;
  font-weight: 400;
  font-size: .9em;
  &:hover {
    cursor: pointer;
  }
}

.wallet {
  display: flex;
  flex-direction: column;

  .balance {
    text-transform: uppercase;
    letter-spacing: 1px;
    font-weight: 400;
    font-size: .9em;
    display: inline-flex;
    margin-top: 10px;
    padding: 0.75rem;
    background-color: #f4f6f8;
  }
}

.transfer {
  display: flex;
  flex-direction: column;
}
Create a server.js file and paste the code below;
import axios from "axios";

const server = axios.create({
  baseURL: "http://localhost:3042",
});

export default server;
This creates an Axios instance that uses http://localhost:3042 as the base URL, this is the URL our server will be listening on. The Axios instance is exported to be used by other services.
Now we would need to create a very important function. Here we would use cryptographic functions 😁. Specifically, the keccak256 hash function, which would be used to hash our transaction messages.
Create a `services.js` file, and paste the code below;
import { keccak256 } from "ethereum-cryptography/keccak"
import { utf8ToBytes, toHex } from "ethereum-cryptography/utils"

export async function hashMessage(message){
    return toHex(keccak256(utf8ToBytes(message)))
}
Now let's talk about what is happening here.
We have created a hashMessage function, which accepts a message (string) and returns a hash (string).
Keccak256, the function is imported from the Ethereum cryptography package installed earlier, it accepts bytes (Uint8Array) and returns a hash of fixed-sized output. The return type of this hash is a byte. The utf8ToBytes converts the message passed to the function to bytes which are then passed to the keccak256 function.
Finally, the function, toHex, takes the returned bytes from the keccak256 function and converts it to a hexadecimal string, which is then returned by the hashMessage function.
Its purpose is to encrypt a transaction message which would then be sent to the user to sign with their private key 🔑.
Creating the Wallet Component
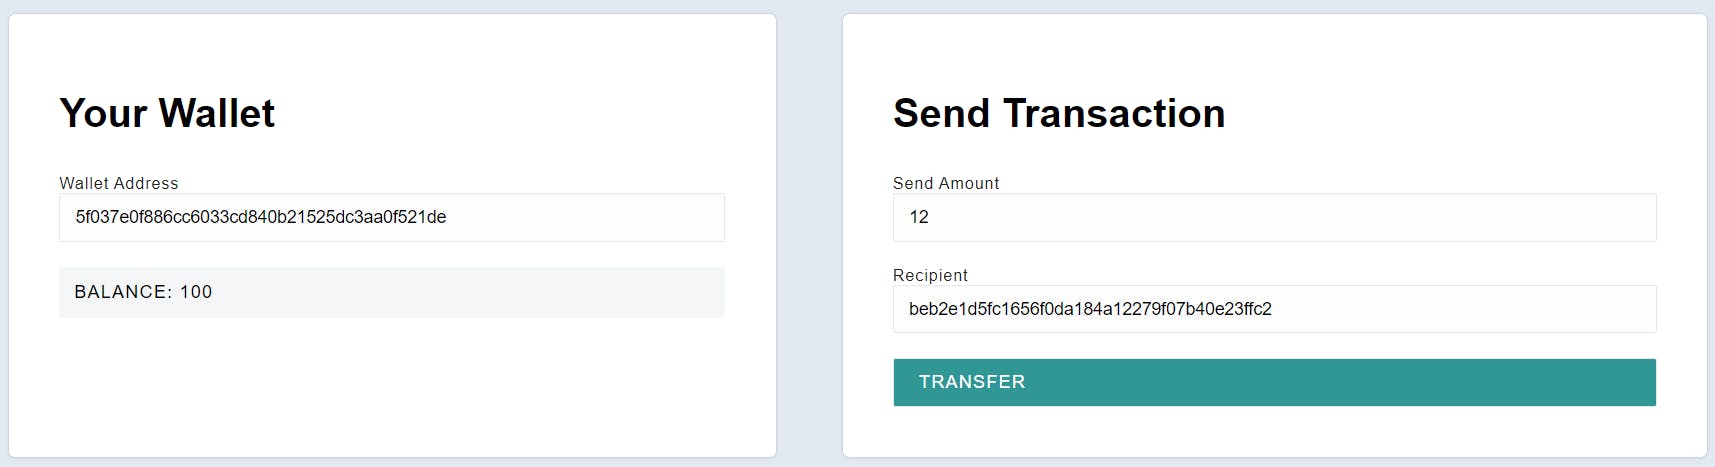
The functionality of this component is to allow the user to input any address and see its balance. Create a Wallet.jsx file in the src directory, then copy and paste the code below into the file.
import server from "./server";

function Wallet({ address, setAddress, balance, setBalance }) {
  async function onChange(evt) {
    const address = evt.target.value;
    setAddress(address);
    if (address) {
      const {
        data: { balance },
      } = await server.get(`balance/${address}`);
      setBalance(balance);
    } else {
      setBalance(0);
    }
  }

  return (
    <div className="container wallet">
      <h1>Your Wallet</h1>

      <label>
        Wallet Address
        <input placeholder="Type an address, for example: 0x1" value={address} onChange={onChange}></input>
      </label>

      <div className="balance">Balance: {balance}</div>
    </div>
  );
}

export default Wallet;
Every time the input changes it will invoke the onChange event handler which will request the address balance from the server. If successful it will update the balance state using the setBalance action. The Balance and Address states are created from the App.jsx App component because their states will be used by the Transfer component too.
Transfer Component
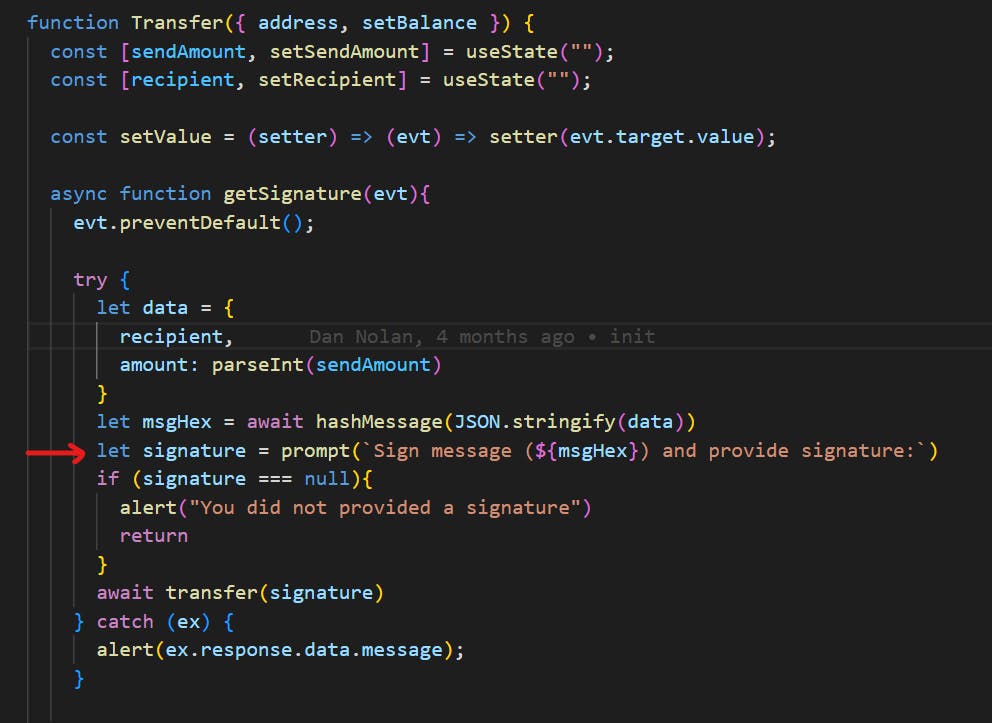
This component will be used by the user to send any amount to any recipient. Create a Transfer.jsx file in the src directory, then copy and paste the code below into the file.
import { useState } from "react";
import server from "./server";
import { hashMessage } from "./services"

function Transfer({ address, setBalance }) {
  const [sendAmount, setSendAmount] = useState("");
  const [recipient, setRecipient] = useState("");

  const setValue = (setter) => (evt) => setter(evt.target.value);

  async function getSignature(evt){
    evt.preventDefault();

    try {
      let data = {
        recipient,
        amount: parseInt(sendAmount)
      }
      let msgHex = await hashMessage(JSON.stringify(data))
      let signature = prompt(`Sign message (${msgHex}) and provide signature:`)
      if (signature === null){
        alert("You did not provided a signature")
        return
      }
      await transfer(signature)
    } catch (ex) {
      alert(ex.response.data.message);
    }

  }

  async function transfer(signature) {
    const {
      data: { balance },
    } = await server.post(`send`, {
      sender: address,
      amount: parseInt(sendAmount),
      recipient,
      signature,
    });
    setBalance(balance);
    alert("Funds transferred successfully!")
  }

  return (
    <form className="container transfer" onSubmit={getSignature}>
      <h1>Send Transaction</h1>

      <label>
        Send Amount
        <input
          placeholder="1, 2, 3..."
          value={sendAmount}
          onChange={setValue(setSendAmount)}
        ></input>
      </label>

      <label>
        Recipient
        <input
          placeholder="Type an address, for example: 0x2"
          value={recipient}
          onChange={setValue(setRecipient)}
        ></input>
      </label>

      <input type="submit" className="button" value="Transfer" />
    </form>
  );
}

export default Transfer;
This is a lot, so let's break it down.
...
function Transfer({ address, setBalance })
...
The transfer component accepts two values;
address - state object which is the sender's (user's) address
setBalance - state action which will be used to update the user's balance
const [sendAmount, setSendAmount] = useState("");
const [recipient, setRecipient] = useState("");
These states are used to set the amount to be sent and the recipient's address.
...
const setValue = (setter) => (evt) => setter(evt.target.value);
...
This function takes in a callable, setter as an argument and returns an event handler. The function of the event handler is to pass the target value of the event object as an argument to setter.
It's used here;
...
<label>
  Send Amount
  <input
    placeholder="1, 2, 3..."
    value={sendAmount}
    onChange={setValue(setSendAmount)}
  ></input>
</label>

<label>
  Recipient
  <input
    placeholder="Type an address, for example: 0x2"
    value={recipient}
    onChange={setValue(setRecipient)}
  ></input>
</label>
...
The function, setValue , is used for the onChange events of both inputs above. Which updates the states of both amount and recipient with the values of their respective inputs.
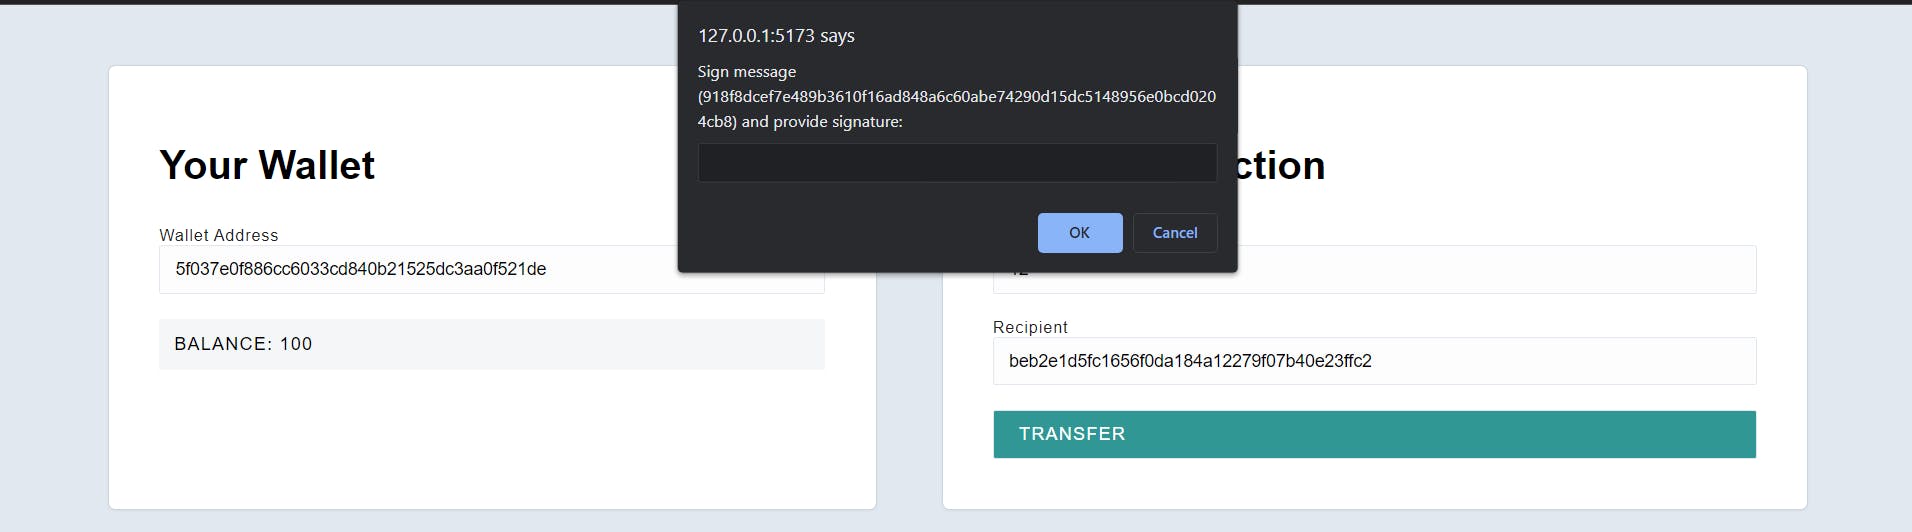
Now, the function, getSignature , will be demystified. The goal here is that when the user enters a recipient address, the amount to be sent, and submits the form. A transaction object will be created which will contain the amount and recipient address, this transaction will then be displayed to the user so that they can sign it with their private key 🔑. Then the signature will be passed to the transfer function.
...
async function getSignature(evt){
  evt.preventDefault();

  try {
    let data = {
      recipient,
      amount: parseInt(sendAmount)
    }
    let msgHex = await hashMessage(JSON.stringify(data))
    let signature = prompt(`Sign message (${msgHex}) and provide signature:`)
    if (signature === null){
      alert("You did not provided a signature")
      return
    }
    await transfer(signature)
  } catch (ex) {
    alert(ex.response.data.message);
  }
}
...
The transfer function;
...
async function transfer(signature) {
  const {
    data: { balance },
  } = await server.post(`send`, {
    sender: address,
    amount: parseInt(sendAmount),
    recipient,
    signature,
  });
  setBalance(balance);
  alert("Funds transferred successfully!")
}
...
This sends the signature and the transaction data to the server. If the signature is valid for the transaction data, then the money will be transferred to the recipient's address.
That's all for the client-side application.
Server-Side NodeJS Application
The backend will be an express application. It's going to have two simple handlers;
GET /balance/:address - to get an address balance
POST /send - to transfer funds from one address to another.
Also, we would need to create some useful scripts for generating new random wallets and signing transactions. The latter is meant to help users sign transaction messages with their private key 🔑.
Firstly, let's set up the server directory. If not already created, create a new directory, server , in the root directory. Move into the directory, and run npm init -y to initialize the default package.json file.
Copy and paste the content below into the package.json file.
{
  "name": "server",
  "version": "1.0.0",
  "description": "",
  "main": "index.js",
  "scripts": {
    "generate": "node ./scripts/gen.js",
    "sign": "node ./scripts/signer.js",
    "test": "echo \"Error: no test specified\" && exit 1"
  },
  "keywords": [],
  "author": "",
  "license": "ISC",
  "dependencies": {
    "cors": "^2.8.5",
    "ethereum-cryptography": "^1.1.2",
    "express": "^4.18.1",
    "yargs": "^17.6.2"
  }
}
Then run npm install to install dependencies.
Before creating the scripts for generate and sign, we will be creating services.js first to define shared functions.
Services
Create a new file service.js in the server directory. Copy and paste the code below into it.
const secp = require("ethereum-cryptography/secp256k1");
const { keccak256 } = require("ethereum-cryptography/keccak")
const { utf8ToBytes, toHex } = require("ethereum-cryptography/utils")


function extractPublicKey(fullKey){
    let kec = keccak256(fullKey.slice(1, fullKey.length));
    return toHex(kec.slice(kec.length - 20, kec.length))
}


function verifySignature(sig, msg, pubKey){
    const msgHash = keccak256(utf8ToBytes(msg));
    let actualSignature = sig.slice(0, sig.length - 1)
    let recoveryBit = parseInt(sig[sig.length - 1])
    const sigPubKey = secp.recoverPublicKey(msgHash, actualSignature, recoveryBit);
    const mainKey = extractPublicKey(sigPubKey);
    return mainKey == pubKey
}

module.exports = {
    verifySignature,
    extractPublicKey
}
The function, extractPublicKey, accepts bytes array as an argument, this is the byte format of a full public key. Then hashes it with keccak256 and returns the hexadecimal string of the last 20 bytes of the hash. Ethereum docs explains why it's required. It's to make it shorter 😉.
The last function, verifySignature, accepts a signature, a transaction message, and the sender's public key. All this data is required to verify that the transaction message was indeed signed using the private key of the owner of the public key.
The function hashes the transaction message and used [recoverPublicKey](github.com/ethereum/js-ethereum-cryptograph.. to get the public key of the signer. After extracting the short format using extractPublicKey, it compares it will the public key, pubKey, passed to the function.
Script - generate: Generating new random public and private key pairs
const secp = require("ethereum-cryptography/secp256k1")
const { toHex } = require('ethereum-cryptography/utils')
const { extractPublicKey } = require('../services')


let privateKey = secp.utils.randomPrivateKey();
let pubKey = secp.getPublicKey(privateKey)

pubKey = extractPublicKey(pubKey)

console.log("Private key:", toHex(privateKey))
console.log("Public key:", pubKey)
A new private key is generated using the randomPrivatekey function. The public key is also extracted from the private key. The mathematical property that made this possible is so amazing. The private key can never be known from the public key.
Script usage example:
npm run generate
Console output:

Script - sign: Signing transaction messages
const yargs = require('yargs/yargs')
const { hideBin } = require('yargs/helpers')
const secp = require('ethereum-cryptography/secp256k1')
const { toHex } = require("ethereum-cryptography/utils")
let args = yargs(hideBin(process.argv))
.option('private_key', {
alias: 'p',
type: 'string',
description: 'Your Private Key',
demandOption: true
})
.option('data', {
alias: 'd',
type: 'string',
description: 'Payload to sign',
demandOption: true
})
.parse()
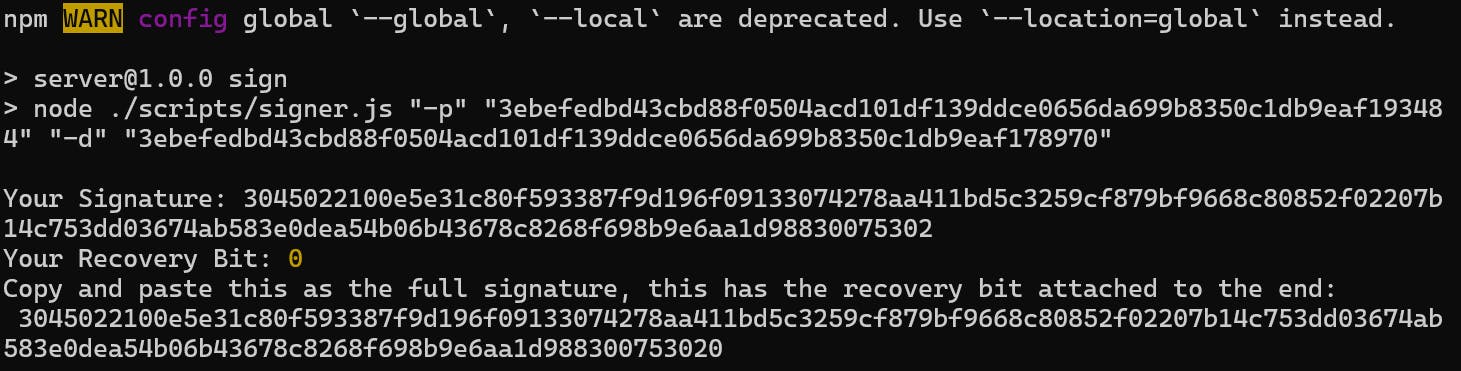
let privKey = args.private_key
let msgHash = args.data
secp.sign(secp.utils.hexToBytes(msgHash), privKey, { recovered: true }).then(data => {
const [signature, recovery_bit] = data
let sig = toHex(signature);
console.log("Your Signature:", sig)
console.log("Your Recovery Bit:", recovery_bit)
let fullSig = sig + recovery_bit.toString()
console.log("Copy and paste this as the full signature, this has the recovery bit attached to the end:\n", fullSig)
})
This is more of a CLI tool. It accepts the private key and message hash as command-line arguments. The sign function from the module, ethereum-cryptography/secp256k1 , is used to sign the message hash, msgHash. The result of the signature and recovery_bit received from the data are later concatenated to form a single string, signature, which is logged to the console.
The signature is expected in the component, Transfer , in the client-side application.
So the user can copy it from the console and paste it into the prompt.
Script usage example
npm run sign -- -p 3ebefedbd43cbd88f0504acd101df139ddce0656da699b8350c1db9eaf193484 -d 3ebefedbd43cbd88f0504acd101df139ddce0656da699b8350c1db9eaf178970
Console output:
Now create the index.js file, which will contain our API routes and handlers, in the src directory.
Follow the steps below and paste the codes gradually.
const express = require("express");
const app = express();
const cors = require("cors");
const port = 3042;
const { verifySignature } = require("./services")


app.use(cors());
app.use(express.json());

const balances = {
  "KEY_A": 100,
  "KEY_B": 50,
  "KEY_C": 75,
  // KEY_N: Any amount
};
The object, balances , is currently acting as the database. The keys of the object will be public keys of different wallets, and the values will be their respective balance.
New public and private key pairs can be generated using the generate script. After creating any amount of key pairs, update the object, balances, with the public keys. Make sure to save their respective private keys too, so they can be used later for signing transaction messages.
GET - /balance/:address
app.get("/balance/:address", (req, res) => {
  const { address } = req.params;
  const balance = balances[address] || 0;
  res.send({ balance });
});
This is the route used to get an address balance.
POST - /send
app.post("/send", (req, res) => {
  const { sender, recipient, amount, signature } = req.body;

  const msg = JSON.stringify({
    recipient,
    amount
  })
  let isValid = verifySignature(signature, msg, sender);
  if (isValid === false){
    res.status(400).send({ message: "Invalid Signature!" })
    return
  }

  setInitialBalance(sender);
  setInitialBalance(recipient);

  if (balances[sender] < amount) {
    res.status(400).send({ message: "Not enough funds!" });
  } else {
    balances[sender] -= amount;
    balances[recipient] += amount;
    res.send({ balance: balances[sender] });
  }
});
This route verifies the amount and recipient, against the signature and public key of the sender. If the signature is valid, it tries to debit the sender, if this is successful it will update the recipient balance.
Lastly,
app.listen(port, () => {
  console.log(`Listening on port ${port}!`);
});

function setInitialBalance(address) {
  if (!balances[address]) {
    balances[address] = 0;
  }
}
Start the server to listen on any given port.
If the port is changed, make sure it's also updated in the client application.
The function, setInitialBalance, checks if an address exists in the database. If the address does not exist, it adds the address to the database with a balance of zero. This is a very nice method, as we don't need to manually add new users to our database.
Project codes are Github
Resources
Cryptographic tools for Ethereum - Ethereum Cryptography
Node CLI tool - Yargs
Play with Cryptographic hashes - SHA256 Online tool
Public Key Cryptography - RSA Algorithm & Elliptic Digital Curves (ECDSA)
Cryptography in HTTPS - Diffie Hellman Key Exchange & TLS handshake for HTTPS
Conclusion
The idea presented in this article can also be used in several fields of technology to maintain data integrity when data is transferred between several components through a network.
One flaw of the server built today is that it's a single node, which makes the database a centralized instance. This is where a blockchain ledger would be useful because it's managed by more nodes which are all bound by rules (consensus) making the whole system decentralized. An account with a public key, TEST, on node A, would have the same balance on node B.
Building applications on the blockchain will be covered later in new articles, subscribe to the newsletter to receive notifications when new articles drop.
Follow me on Twitter netrobeweb.